
Typography is the non-verbal communication of the web. It has an immense influence on the look and feel of your website. A correctly chosen font will catch attention and instantly convey what your brand is about. You almost certainly want to switch from your theme’s default font to something with a bit more personality. The question is, how do you add custom fonts to WordPress?
We’ve written before on how to add a custom font by editing your theme’s stylesheet. However, hunting for code snippets that contain the font you want to replace can be time-consuming and just not fun! You won’t see the changes until you save them and switch to the front end. Then, if you don’t like those changes, you need to adjust the code again.
Wouldn’t you rather see exactly what this font will look like in your sidebar? Whether it adds personality or just clutter? Does it need to be bigger, smaller or bolder? And if you decide that this font, after all, has no place on your website, wouldn’t you appreciate an opportunity to reverse the changes with just one click?
You can do all of those things (and more!) with CSS Hero. CSS Hero comes with a comprehensive selection of Google fonts, but for the sake of keeping the plugin light, we didn’t include all of them. However, you can easily add more fonts from Google and other popular sources and use them with CSS Hero.
Since you can’t add a font directly within CSS Hero plugin, you first have to install it on your WordPress website. There are many ways to do that, including uploading a new font folder to your child theme, using @font-face rule and then adding CSS code to define where that font will be used. However, this tutorial looks at the easy, fast, zero-coding-involved solutions provided by various font-loading plugins. The CSS Hero + a font-loading plugin tandem is especially powerful because sometimes your theme settings may override the generic tags applied by the plugins. With CSS Hero, you can target the specific element you want to change and override theme settings with !Important button.
The popular font providers listed below have thousands of gorgeous free and premium fonts. Our post covers plugins that will help you quickly install fonts from these directories on your WordPress website.
- Google Fonts
- TypeKit
- Font Squirrel
- Fonts.com
- My Fonts
- Dafont
- Fontdeck
Adding custom fonts to CSS Hero
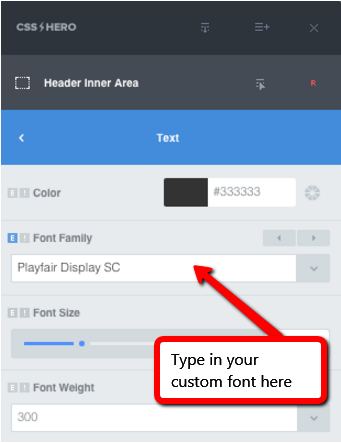
Once you add a font to your website with one of the plugins, you will be able to use it with CSS Hero. Target a text element, open the Text menu, and type the name of the font you just uploaded in the Font-family input field. CSS Hero will load your font, and you will see the targeted element change live. You will only have to manually input the font once. After that, CSS Hero stores it, and you will be able to select it from the drop-down list.
Adding custom fonts to CSS Hero
Plugins that can pull custom fonts from several sources
Use Any Font
If you want to use custom fonts from various sources, this plugin delivers on its promise and gives you the freedom to use absolutely any font on your website. Use Any Font embeds fonts using the @font-face CSS rule we mentioned before – but this time, the plugin will do the work for you. You can upload fonts in ttf, otf, and woff formats. Use Any Font will automatically convert them into web fonts; no need to use a web font generator. From the plugin setup page, you can quickly select pre-defined HTML tags for your font or assign it to custom CSS.
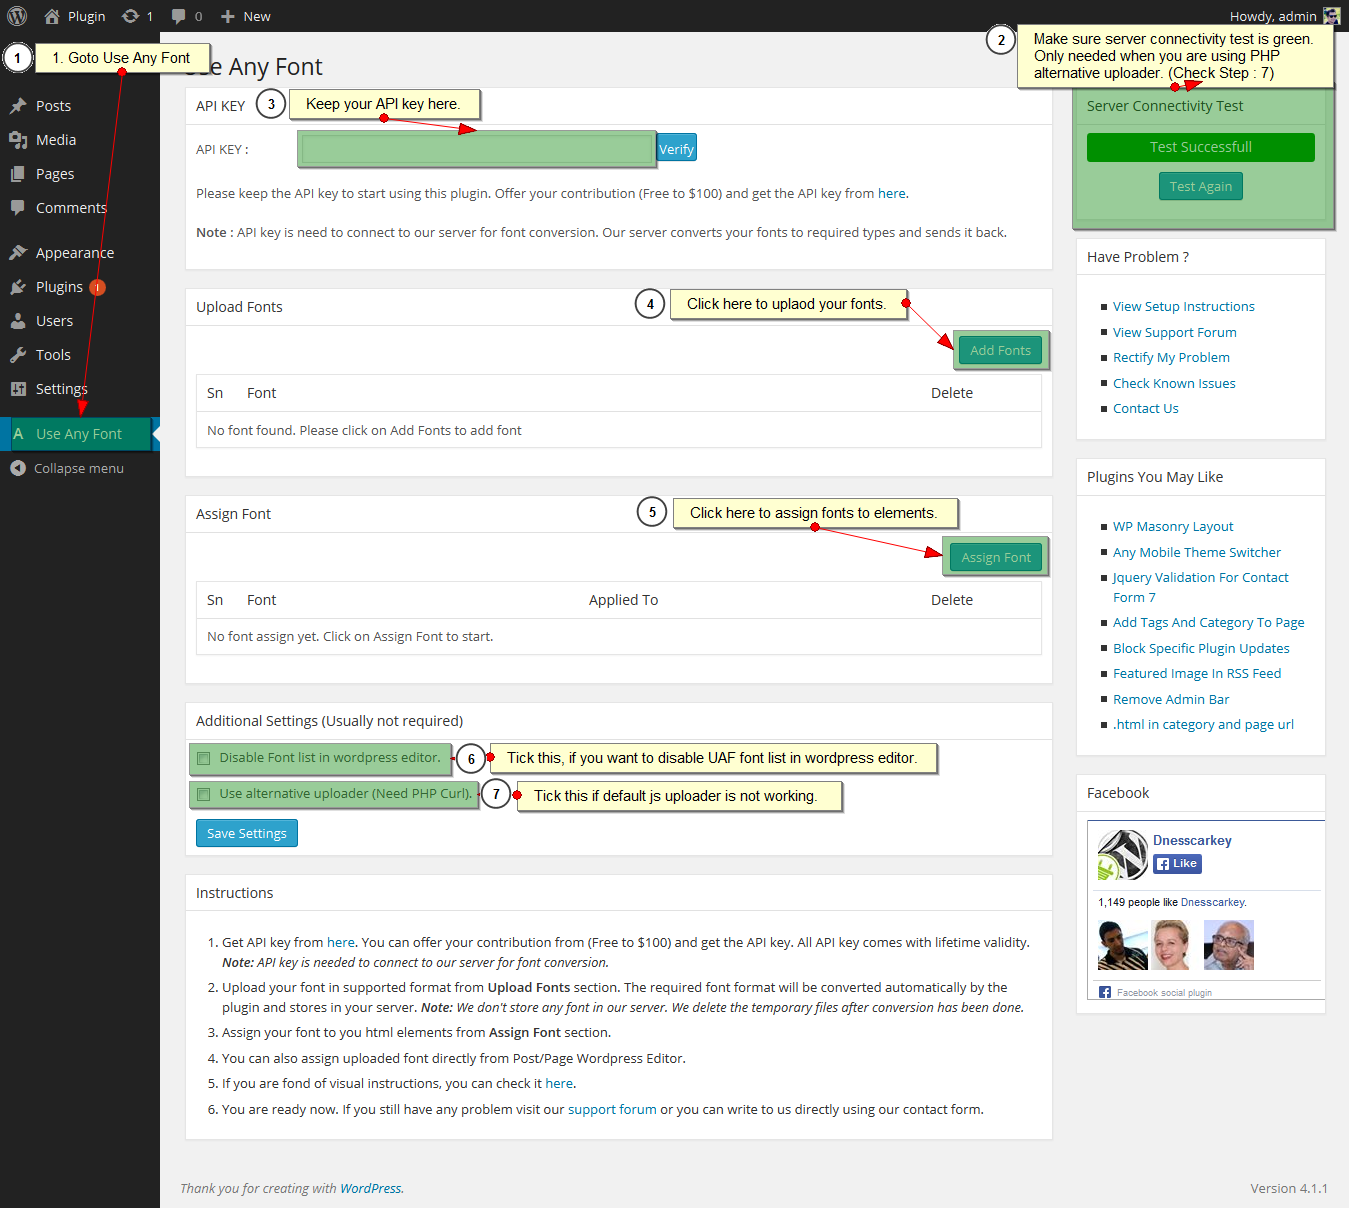
Use Any Font plugin setup
You do need an API key for this plugin which will run you ar least $10 if you want to use more than one font.
FontMeister
This free plugin pulls custom fonts from Typekit, FontSquirrel, Google Fonts and FontDeck via API integration. In the future, you can expect FontMeister to work with fonts from Fonts.com and manually uploaded @font-face kits. FontMeister does have some known issues with Font Squirrel fonts, so if you are experiencing a problem with it, you might have to upload this font with Use Any Font plugin instead. In general, FontMeister is less reliable than Use Any Font.
You will need to enter your details for the individual providers in the “Font Sources” section of the plugin. Then you can pick the fonts you want to use in the “Fonts” section.
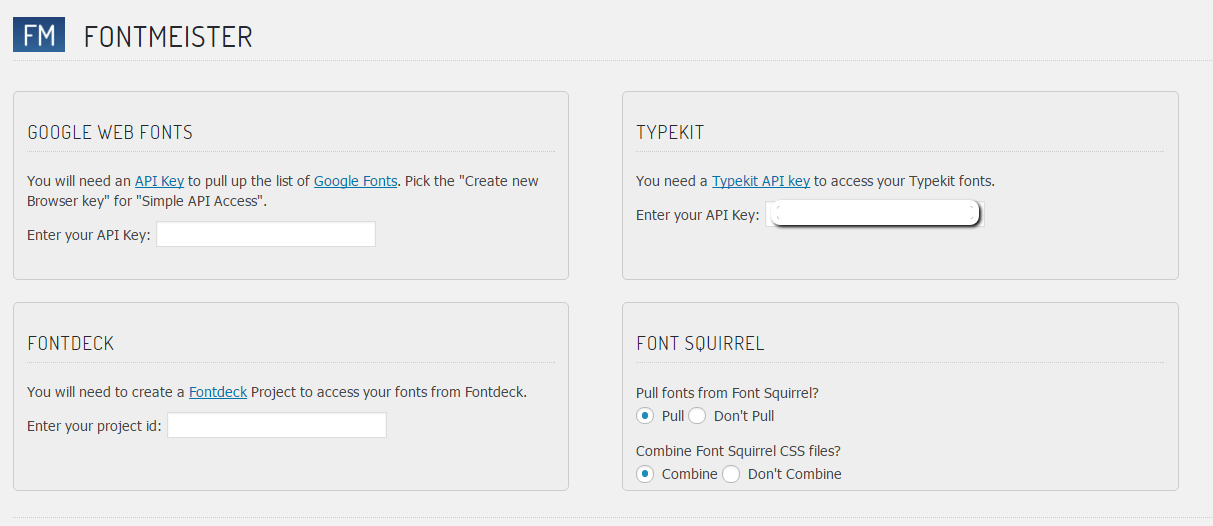
FontMeister – connect your font sources
FontMeister enables you to preview the fonts in the backend and specify the CSS selectors for them.
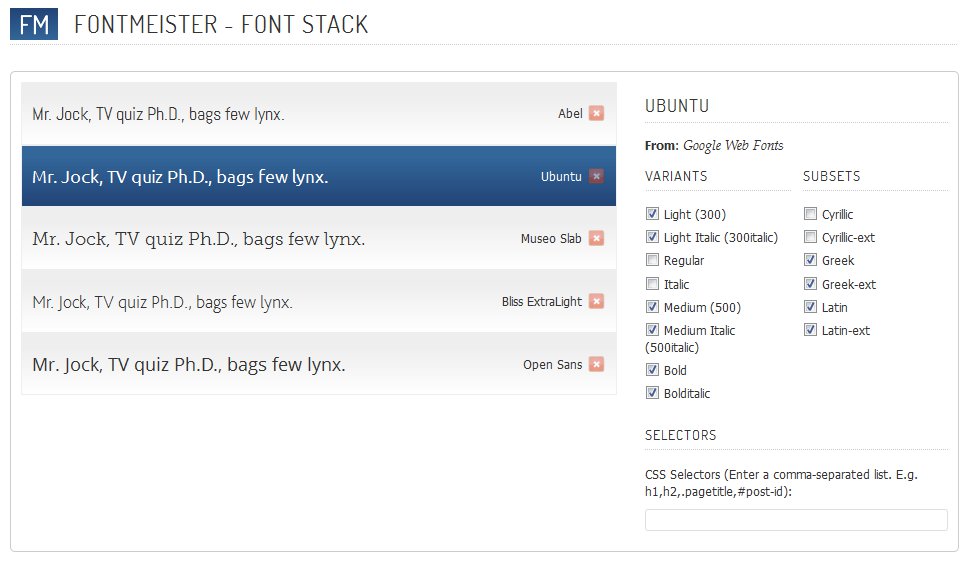
Preview your fonts in FontMeister and assign selectors to each font
While it is convenient to use just one plugin to add custom fonts from different sources, sometimes, using the plugin targeted to just one font source is faster and more straightforward. For example, when using WP Google Fonts plugin, you don’t need to upload the font or provide an API key; you can simply choose the font and its specifications from the plugin panel.
Since the rule of thumb is to use only two fonts on your website, you are not running the risk of overloading your site with font plugins.
Plugins targeted to one font provider
Add custom fonts to WordPress with WP Google Fonts
WP Google Fonts plugin is probably the fastest way to add Google Fonts to your website. It’s extremely easy to use. You can choose from hundreds of custom fonts, and assign the fonts to the specific elements of your site. The only drawback is that the plugin doesn’t give you the ability to preview fonts, so you want to choose your font before going to the WP Google fonts plugin to add it. The next step is to add the new font to CSS Hero by typing it in the Font-family field to get a real-time view of how it looks on your site.
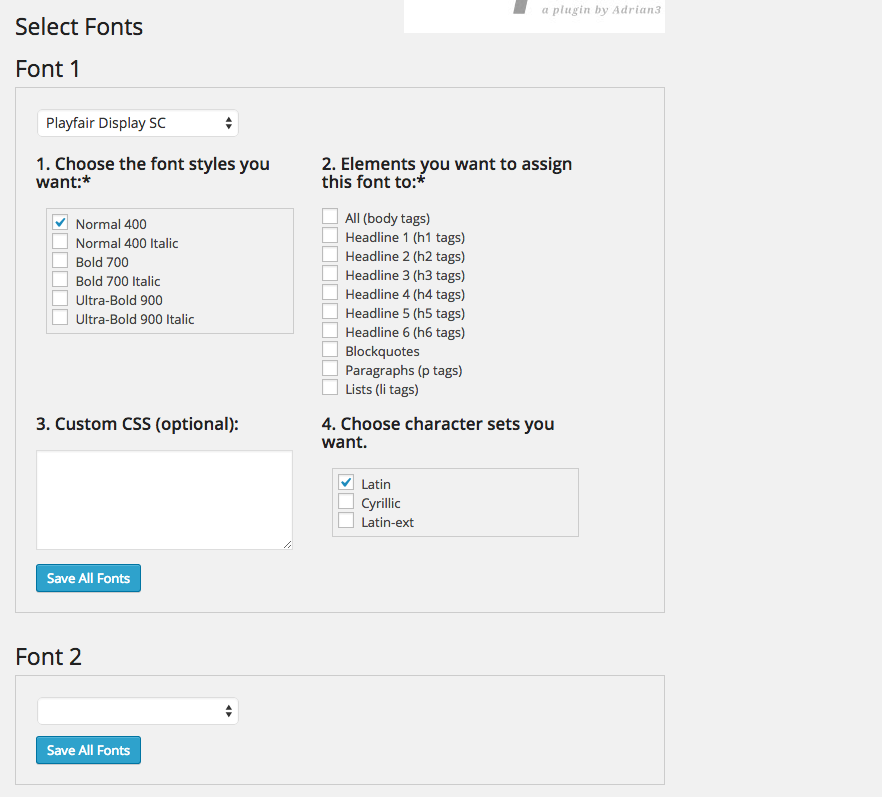
Add custom fonts using WP Google Fonts
Add TypeKit custom fonts to your WordPress site
If you want to use fonts from TypeKit, you will have to do a bit more work. First, you have to sign up for an account at TypeKit.com and create a font kit, or a collection of fonts you would like to use. Depending on the account level, you may be limited in the number of kits you can create. Once you have that set up, download and install TypeKit Fonts for WordPpress plugin. Paste your kit’s embed code on the plugin settings page.

TypeKit Fonts for WordPress plugin – embed code
You can either configure CSS selectors in the TypeKit.com interface, while in your kit (image below), or define your own CSS rules in the plugin. If you are not entirely comfortable with this, you can use CSS Hero plugin to select the elements you want to be rendered in the new font and edit them live.
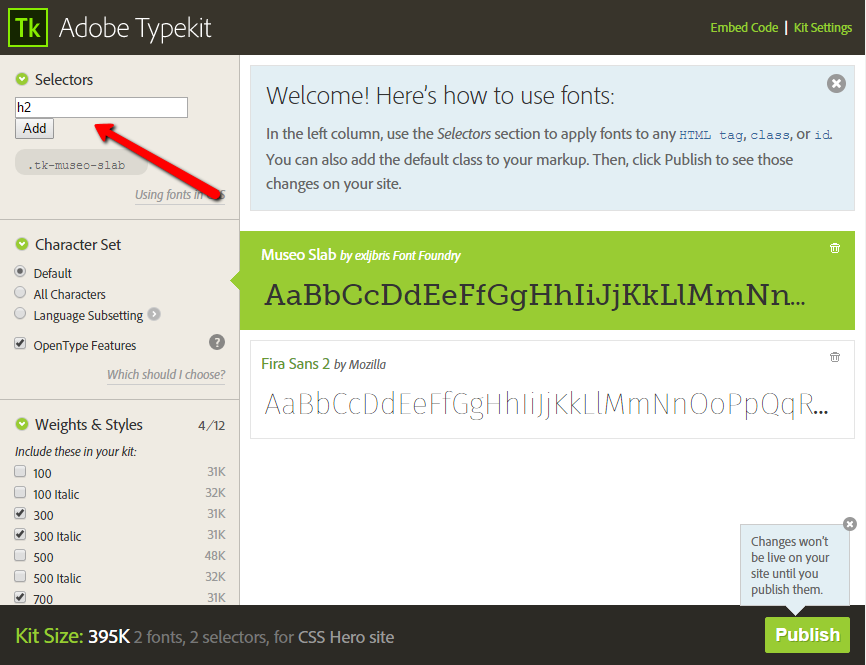
Adding custom fonts with TypeKit – configure your CSS selectors while in the kit
The biggest drawback of this plugin is that every time you want to use a new font, you will have to return to TypeKit website, create a new kit, configure it, and only then embed the code in the plugin.
Adding custom fonts from Fonts.com, FontDeck, Font Squirrel and other sources
While there are WordPress plugins for adding fonts from Fonts.com and FontDeck, both haven’t been updated in over three years, so you are probably better off uploading fonts from these providers via Use Any Font plugin or FontMeister, just to avoid any security and compatibility issues.
There is an unofficial plugin for uploading Font Squirrel fonts; however, it also hasn’t been updated in two years. The plugin has a convenient interface with an ability to preview fonts, so you can give it a try. You won’t have an option to configure selectors for the font, but you can use it within the WordPress editor. Unfortunately, this plugin doesn’t play nicely with CSS Hero – we couldn’t get the fonts to render while live editing. If you prefer to have a Font Squirrel font loaded in CSS Hero, we recommend installing it with Use Any Font plugin.
If you want to utilize fonts from MyFonts or Dafont, Use Any Font plugin is, again, a fantastic option. Aside from installing Google Fonts and TypeKit fonts, Use Any Font is the most convenient way to upload a font to your website – and it works seamlessly with CSS Hero. As soon as the font is uploaded, you can navigate to CSS Hero’s Text menu, type your font name in the Font-family field, and see changes live.
Exploring new fonts is super-exciting. However, keep in mind that too many fonts can make your design look inconsistent and even slow down your website, so only install the fonts and font weights that you will use. Finally, always make sure that the font you put your eye on has a license suitable for your use.
We covered the no-code solutions to using fonts from the most popular font providers. If you have found this article useful, consider sharing it with your friends. They just might be looking for a way to freshen up their website with some beautiful typography.