
“Whoa! I just knocked out some massive website changes in a matter of minutes!” Don’t you wish you heard yourself say this more often? We are all aiming for “faster, better, more productive” nowadays, and theme customization is no exception.
We hope you find that CSS Hero already saves you a good many precious minutes or even hours with its real-time CSS editing functionality. No need to switch between the WordPress editor and the frontend, no need to wait for the changes to load, no wasted time, superpowers galore.
However, once you’ve had that satisfying experience for a while (as many CSS Hero users have), you might find yourself wishing there was an EVEN FASTER way to edit your theme. As easy as it is to pull on the toggles and style your theme with CSS Hero, you kind of start wishing you didn’t have to enter the parameters over and over again, such as when you switch from editing one page to another, for example.
So today we will take a look at the tools within CSS Hero that can seriously speed up your theme editing. Some of these tools we mentioned in the past, and you may have even used them. This post examines them from the following angle: How can these tools make the process of styling a WordPress theme faster and more convenient?
All of these tools are super-easy to leverage. Once you do, you will feel like a productivity superhero!
-
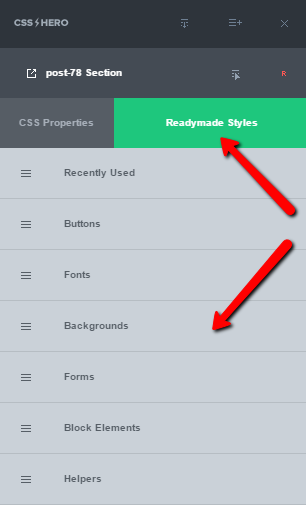
Readymade Styles
This relatively new feature, added in CSS Hero 2.0, enables you to make extensive design changes in mere seconds. You can style the most common elements of your site – buttons, images, forms, backgrounds – in a few clicks, using dozen of designs as a starting point.
CSS Hero Readymade Styles
After applying a Readymade Style, you can additionally customize the element, of course, but now it will take a lot less time. Having Readymade Styles as a foundation to build on truly speeds up theme customization. It becomes as easy as Target the element – Apply a Readymade Style – Set it live!
Divi theme users will be able to leverage Readymade Styles even more, using 29 predefined theme skins. Theme skins will swap out the color scheme and fonts on the entire website, giving it a new look in a matter of seconds.
Read more about the Readymade Styles tool here, view the video below, or try it out yourself!
-
Cloning Styles
Cloning, or Copy-Pasting styles, is another extremely useful feature, following one of the most used behaviour introduced with the computer age: The Copy and Paste aka CTRL-C, CTRL-V or ⌘+C ⌘+v
This featured has been added from the CSS Hero 1.5 version.
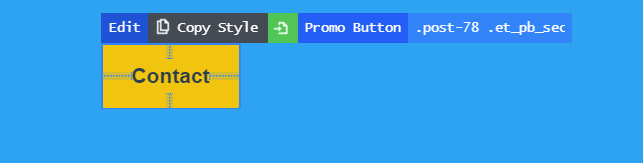
It hugely speeds up your design process by letting you selectively copy and paste element styles. Thus, you can quickly replicate a style you have created for a particular element.
As you can see in the video above, you simply Copy Style from one element, then target a different element, and click Paste. Some properties get copied by default, and others you have to click on to copy them, also.
Step 1. Copy element style with CSS Hero
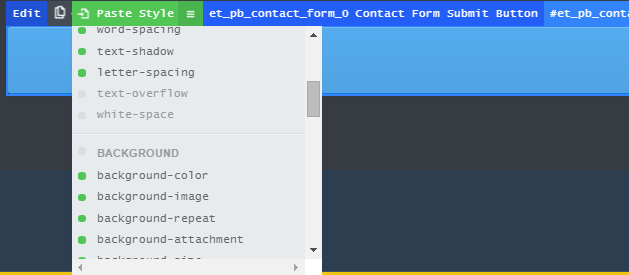
Step 2. Paste style, choosing the properties you want to apply
Cloning Styles feature is designed to mainly copy small elements’ styles, such as titles, text boxes, buttons, links and so on. You won’t be able to copy an overall look of the page with this tool, for example.
Further, Cloning Styles works only for elements on the same page. However, in point 5 of this list, we’ll take a look at another solution for creating replicable styles across web pages.
-
Presets
Presets are extremely useful if you want to store snapshots of your work with one click. You can save a preset, thus saving all current CSS customizations made with CSS Hero, and recall (load) it whenever you want. Presets can be stored locally (in your site’s database) or “in the cloud” (in your CSS Hero account).
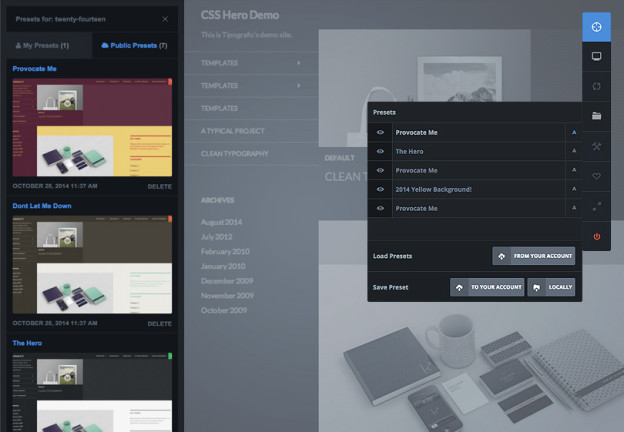
Using CSS Hero Presets tool
Presets can accelerate you work in the following ways:
- A preset stored “in the cloud” will speed up immensely the process of migrating to a new site (as long as you are using the same theme). This can be used if you are changing the domain or if you need to move from developer site to production.
- Locally stored presets can serve as prototypes of a website you are drafting, either for yourself or a client. Presets enable you to quickly review and compare the looks you created, so you can settle on one.
- By creating a Preset, you save all of the current CSS Hero settings with one click, and can restore them at any time. This saves you from customizing your theme all over again in case of a database or server crash.
For some themes, public presets are also available. You can load one and use it as a starting point for your website design.
Like with any other feature, you can reverse changes made with Presets tool by going to the History tool and activating the previous “version” of your website.
Below is a video demonstrating how to save and load presets.
-
Export/Import tool
Export/Import tool has functionality somewhat similar to presets. It allows you to quickly backup and restore your website and also migrate from one site to another.
Exporting active settings to a file gives you a reliable backup source in case your website crashes – and unfortunately, every website does, eventually. In that case, you can simply upload the file to your website, and all the customizations made with CSS Hero will be restored. We love easy!
By importing your CSS Hero settings file to a different website with the same theme, you can easily (and speedily) migrate.
-
CSS Custom Class
CSS Custom Class may sound like something complicated that only a web designer could put to good use. However, it’s simply not true, and even someone just discovering CSS can leverage CSS Custom Class to create repeatable styles. And repeatable styles, of course, equal higher productivity. Once you know that you will be creating several elements with the same look, such as several images, icons, or text boxes, you can use CSS Custom Class to make styling these elements a breeze.
The advantage of this method over the Cloning tool is that if you change a property for one Custom Class element, CSS Hero will automatically update it for all other elements of the same class – no need to copy-paste! This even works ACROSS all pages of your website, saving you tons of time.
For example, you want to change the look of your testimonial boxes that you have on several different pages. As long as each testimonial is assigned the same Custom Class, once you update one of them, you have updated all of them!
Now, let’s get to the nuts and bolts of using this neat feature. Here are the steps to using CSS Custom Class – and you can also see how it’s done in the video below.
- Create an element using HTML or a page builder.
- Assign CSS Custom Class to it.
Many page builders, such as CSS Hero-compatible Divi Builder, Visual Composer, and Beaver Builder, give you the ability to assign CSS Custom Class to the elements. Alternatively, you can add CSS Custom Class from the text editor in WordPress backend.
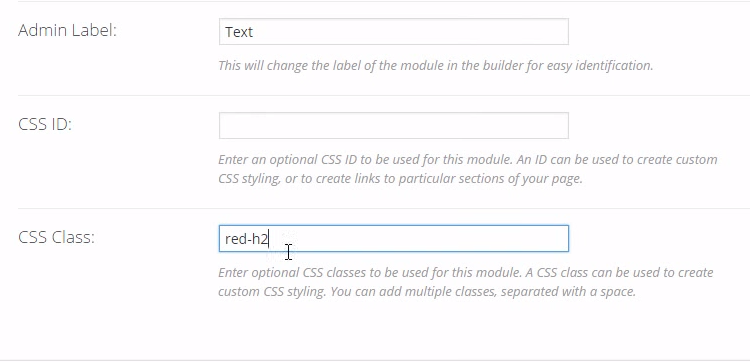
Adding CSS Custom Class through a special field in a page builder
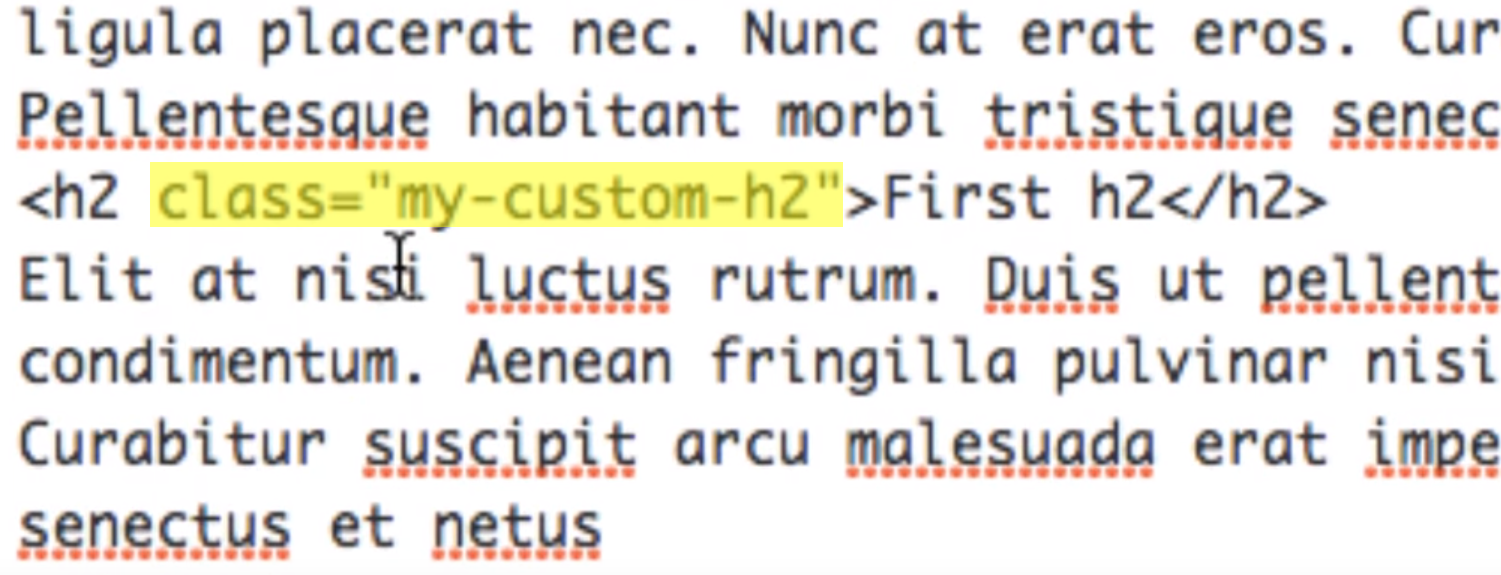
Adding CSS Custom Class through the WordPress Text Editor
- Add the custom class to CSS Hero via the Quick Configurator tool. Make sure that you put a period before the class name and put each class on a separate line. Then click Save Selectors.

Quick Configurator Tool at the top of CSS Hero panel
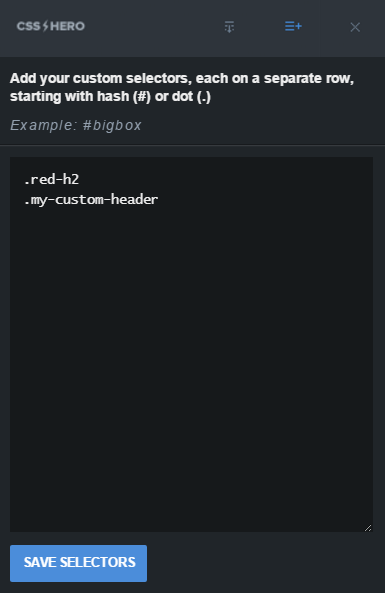
Save CSS Custom Classes in Quick Configurator
- Target the Custom Class element so it is highlighted in blue. Now, instead of a standard label, such as “Header”, you will see “My Custom Header,” for example, above that element.
- Style the element with CSS Hero.
- ALL of the elements belonging to this particular Custom Class adopt the styling you just applied! Wasn’t that easy?
If you would like a video walkthrough, here’s one. Watch just how easy it is to add a CSS Custom Class and style multiple items all at once!
We hope you found these tips useful and will enjoy the power to make lightning-fast customizations to your theme. If you think any of your friends could benefit from this article, consider sharing it with them. Unless, of course, you’d rather make them green with jealousy of how fast you can edit CSS.